
Mission Project: Project Shield
Free Zoom Sewing Classes
What if…
*You lived in Uganda and 24% of your friends drop out of school because they cannot manage their monthly cycle.
*You dig through the landfills / trash to find anything to get you through your feminine cycle.
*You miss one week of school each month, and you can’t make up the missed work, so you eventually drop out of school.
*You dig through the landfills / trash to find anything to get you through your feminine cycle because products cost more than what a family earns in a day.
*You and 80% of females you know have reproductive disease caused by poor feminine cycle hygiene.
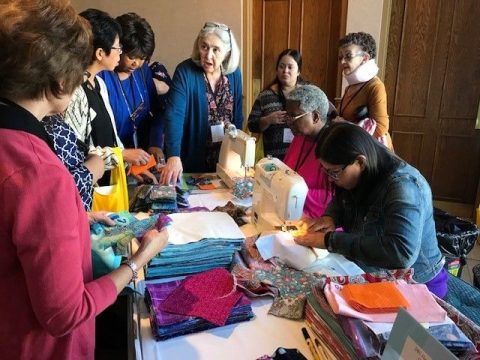
Then you really need a Project Shield kit! Please join Karla Marsh and Sue Carlson on Zoom for Step-by-step instruction on how you can make these reusable feminine hygiene kits in your own homes. These kits will be sent on mission trips to be distributed to local girls and women.
You can make a huge difference in other women’s lives. If you are interested in learning how to make these kits, please email scarlson@ks-ne.org and let me know which class(es) you would like to join and I will send you a link for the class(es) you specify. Each class is the same, just repeated on different days and times to accommodate different schedules.
Free Zoom Class Times: September 14 @ 6:00 – 7:00 pm / September 23 @ 9:00-10:00 am / October 1 @ 3:00-4:00 pm.
PROJECT SHIELD:
Reusable Sanitary Supplies for Women:
Fabric must be 100% woven cotton (quilter’s cotton). Colorful to disguise stains. Avoid the following prints as they are not allowed in some cultures: people, animals, figures, faces, food, bugs, reptiles, guns, knives, girly glam, and camouflage. Butterflies are okay to use.
Wash and dry fabric before cutting. Don’t use dryer sheets.
Waterproof layer must be PUL (polyurethane laminate). Don’t prewash this fabric.
Use 100 % polyester thread.
Choose a colorful, feminine mix of fabric. Avoid making all pieces of the kit the same.
CUTTING SHIELD BODY & PUL LAYER:
Pattern pieces should be equal side to side and top to bottom. To ensure this, fold pattern into quarters and make sure all edges are even. Unfold and make a pattern from card stock or other sturdy template.
CUTTING POCKETS THAT HOLD PADS IN PLACE:
Pockets should be cut 4 ½” wide and 5” long. Fold in half and top stitch along folded edge about ¼” from fold.
SEWING:
Make a “shield sandwich” by layering two shield pieces right sides together with top stitched pockets between at ends. Place pocket fold towards center of shield. Baste or tack pockets along sides within 1/4” seam allowance if needed. DO NOT pin except within seam allowance.
Place one piece of PUL down with the shiny side up. Place shield sandwich on top. Baste or tack together within ¼” seam allowance on sides. Avoid pinning or poking holes in the PUL layer beyond seam allowance. Sew down each side leaving each end open. Trim seams, but not openings.
Turn right side out and press, making sure PUL is shiny side down and pockets are on top. Stitch across ends making sure they are open as wide as possible. Trim ends and corners and flip pockets to the other side. Press. Topstitch all the way around entire body, back stitching at all pocket openings.
Snaps are centered ½” in from finished edge of side wings. Plastic KamSnaps work best.
FLANNEL PADS:
Fabric must be 100% cotton flannel. Colorful to disguise stains. Avoid the following prints as they are not allowed in some cultures: people, animals, figures, faces, food, bugs, reptiles, guns, knives, girly glam, and camouflage. Butterflies are okay to use.
Wash and dry fabric before cutting. Don’t use dryer sheets.
Use 100 % polyester thread.
Choose a colorful, feminine mix of fabric. Avoid making all pieces of the kit the same.
CUTTING:
Pattern will be cut the same size as a piece of paper, 8 ½ x 11. Cut two layers at the same time with right sides together.
SEWING:
Place two pieces of flannel right sides together and sew all the way around leaving an opening to turn. Turn and topstitch ¼” in from finished edge all the way around. Make three seams evenly spaced across the finished pad. Backstitch ends of all seams.
BAGS:
Use cotton duck/canvas fabric for durability.
CUTTING:
Cut a piece 12”x 33” for each bag.
SEWING:
Serge or zig zag around the entire edge of piece.
Measure down 4” from top of bag. Fold in twice at an angle narrowing the end of the bag. Stitch down and repeat on all four corners. Fold down ends twice to make a 1” casing for a drawstring. Stitch down. Fold bag in half with right sides together and stitch up the sides using a ½” seam allowance. Backstitch ends of all seams.
DRAWSTRINGS:
Cut two 26” cords. Para cord is best for durability. Run one cord through both casings making a loop and tie together at ends. Do the same with the second cord tying at opposite side. Can burn ends to prevent fraying.